
The enhanced web wallet has the capability to create a multisig wallet with up to 15 participants. In simple terms, this is a joint account/wallet controlled by up to 15 individuals.
DISCLAIMER: You are advised to use this feature with small amounts of BAY until completely understanding the process and the implications. There is always a posibility to lose your funds if something is not done properly.
For the purpose of this tutorial we are going to create a ‘2 of 3’ multisig wallet. This means 3 participants and requires 2 of them to sign to unlock the funds. For this we will be using the web wallet
Create Multisig Wallet address
We assume we already have 3 wallets created from 3 different individuals and they have sent us their public keys. We are also going to paste the information in here so you can follow this example step by step:
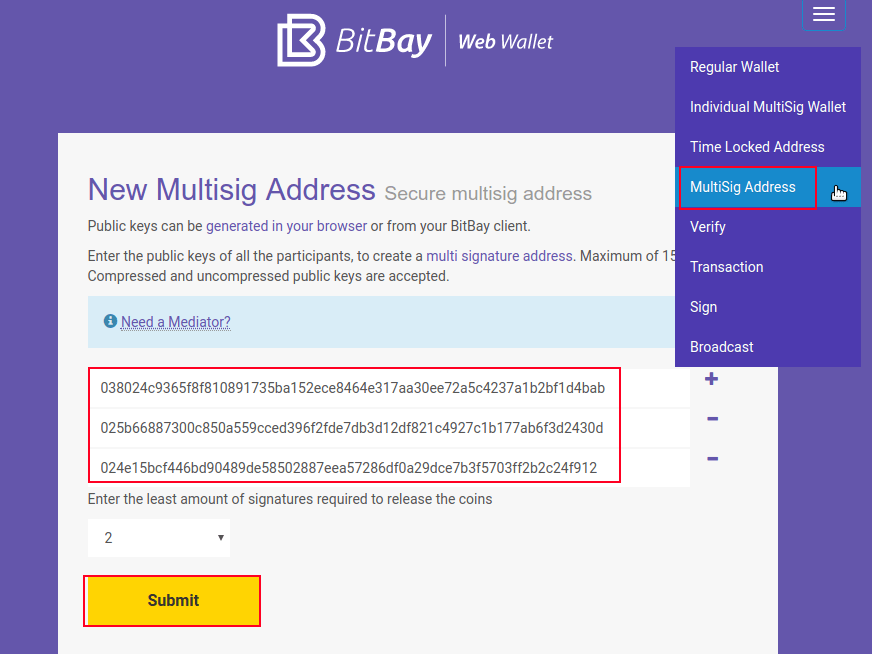
public key1 038024c9365f8f810891735ba152ece8464e317aa30ee72a5c4237a1b2bf1d4bab
public key2 025b66887300c850a559cced396f2fde7db3d12df821c4927c1b177ab6f3d2430d
public key3 024e15bcf446bd90489de58502887eea57286df0a29dce7b3f5703ff2b2c24f912
1.
From the web wallet dropdown menu choose multisig address and fill in the 3 keys given. Leave the 2 required signatures in place and press submit.
2.
You should get the following info (here is what we get for the above keys):
Address bUnqfZPjfcagU3XBLUpTGsEqA2urHt19Yn
Redeem Script 5221038024c9365f8f810891735ba152ece8464e317aa30ee72a5c4237a1b2bf1d4bab21025b66887300c850a559cced396f2fde7db3d12df821c4927c1b177ab6f3d2430d21024e15bcf446bd90489de58502887eea57286df0a29dce7b3f5703ff2b2c24f91253ae
Shareable URL https://wallet.bitbay.market/_test123_/?verify=5221038024c9365f8f810891735ba152ece8464e317aa30ee72a5c4237a1b2bf1d4bab21025b66887300c850a559cced396f2fde7db3d12df821c4927c1b177ab6f3d2430d21024e15bcf446bd90489de58502887eea57286df0a29dce7b3f5703ff2b2c24f91253ae#verify
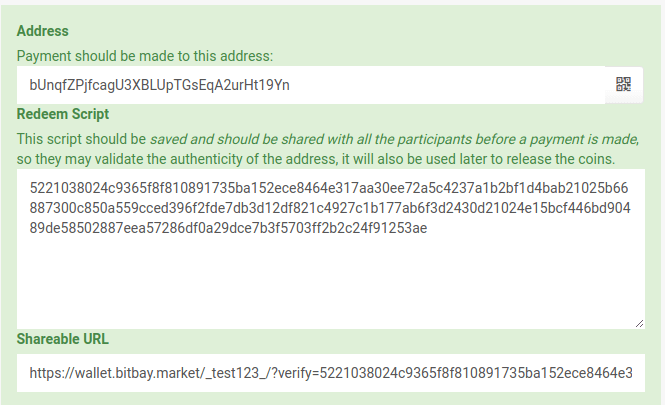
NOTE: It is important to note that the redeem script or shareable URL have to be kept somewhere safe otherwise any funds that go into this account will not be able to be redeemed. The above info can be kept just in case by more than one participant in a safe place (text file, print, bookmark).
3.
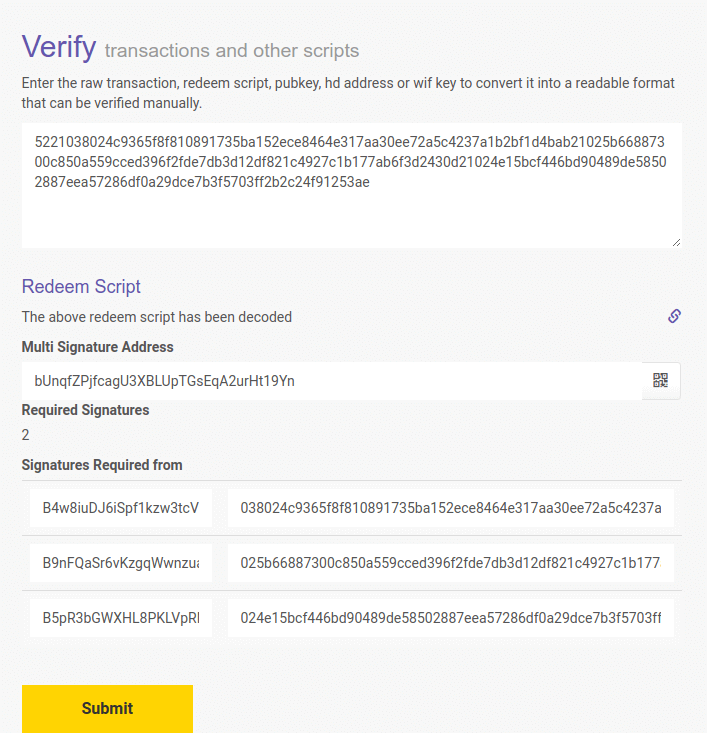
You can verify the previous script using either the shareable URL above or pasting the redeem script using the verify panel from the drop down menu:
4.
Lets assume also for the purpose of this tutorial that we send 1 BAY to this joint (multisig) account. Note that 0.001 was the spend in an intermediate redeem transaction so 0,999 will be used on the rest of the tutorial.
NOTE: if we don’t have any BAY in the account we will get an error when we try to redeem using the following steps.
Redeem the FUNDS in the joint (multisig) account
1.
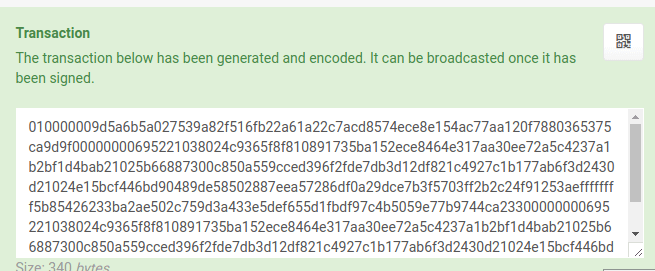
On the web wallet we go to TRANSACTION from the DROP DOWN MENU, paste the redeem script that we have and press LOAD. After a few seconds the form will be filled with all relevant information pertaining to this multisig account. The input tab will say inputs 1.0000 which means the wallet has 1 BAY in it.
We have to specify the output(s) which means where the funds will go. We could have multiple output addresses but for the purpose of this tutorial we will only send the funds to 1 address. We input the amount that the wallet(s) will receive. We should not get the full amount but the amount after subtracting the transaction fee, 0.001 will suffice. Be careful as the transaction fee is autocalculated to be the remainder. For example, if we input 0.999 the fee becomes 0.001. After filling in this information we SUBMIT the form:

The wallet used to redeem the funds in this case: B4w8iuDJ6iSpf1kzw3tcVFrChMtv1QEHeU
IMPORTANT All the funds currently in the wallet have to be redeemed otherwise they become the transaction fee automatically which is why the fee is auto-calculated as the remainder. There is a popup warning if you have left too much BAY as the transaction fee which will prevent you from losing funds without realizing.
HINT If this address needs to be operated like a regular wallet and only send parts of the funds to a third party one can just send the remaining funds back to the multisig address, so instead of 1 output specify a 2nd output (multisig address with remaining funds)
2.
As a result of SUBMITTING the form we get the following RAW transaction
010000009d5a6b5a027539a82f516fb22a61a22c7acd8574ece8e154ac77aa120f7880365375ca9d9f00000000695221038024c9365f8f810891735ba152ece8464e317aa30ee72a5c4237a1b2bf1d4bab21025b66887300c850a559cced396f2fde7db3d12df821c4927c1b177ab6f3d2430d21024e15bcf446bd90489de58502887eea57286df0a29dce7b3f5703ff2b2c24f91253aeffffffff5b85426233ba2ae502c759d3a433e5def655d1fbdf97c4b5059e77b9744ca23300000000695221038024c9365f8f810891735ba152ece8464e317aa30ee72a5c4237a1b2bf1d4bab21025b66887300c850a559cced396f2fde7db3d12df821c4927c1b177ab6f3d2430d21024e15bcf446bd90489de58502887eea57286df0a29dce7b3f5703ff2b2c24f91253aeffffffff01605af405000000001976a914054e3d7f9acff76037ebb8836f255a411bc3798e88ac00000000
3.
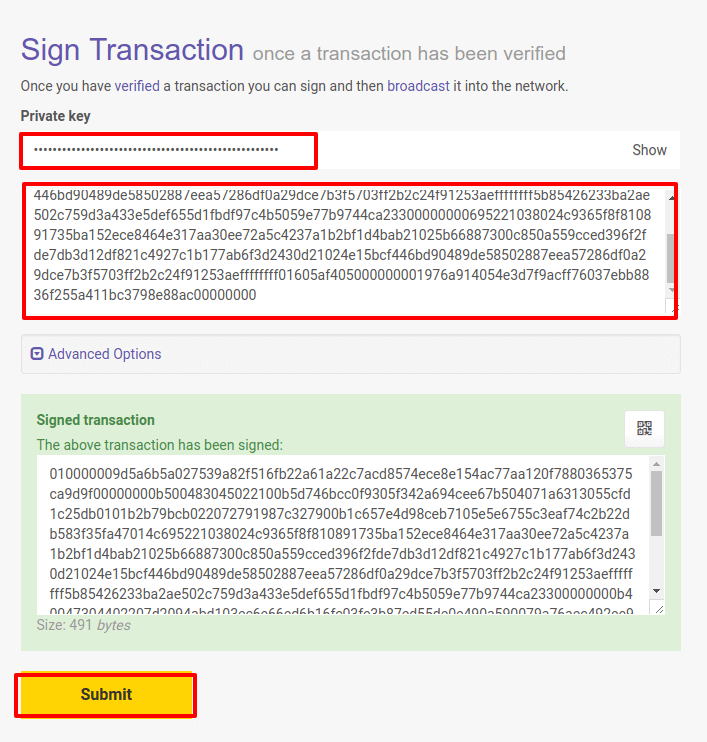
We now go to the sign panel from the drop down menu and we use as inputs the transaction and the private key for 1 of the wallets involved (as we said we have 3 wallets / 3 participants). Below is the signed transaction.
NOTE The order we sign the transactions should be the same order we used to create the multisig address. For the purpose of this turorial we are using the 2nd wallet’s private key on this step.
010000009d5a6b5a027539a82f516fb22a61a22c7acd8574ece8e154ac77aa120f7880365375ca9d9f00000000b500483045022100b5d746bcc0f9305f342a694cee67b504071a6313055cfd1c25db0101b2b79bcb022072791987c327900b1c657e4d98ceb7105e5e6755c3eaf74c2b22db583f35fa47014c695221038024c9365f8f810891735ba152ece8464e317aa30ee72a5c4237a1b2bf1d4bab21025b66887300c850a559cced396f2fde7db3d12df821c4927c1b177ab6f3d2430d21024e15bcf446bd90489de58502887eea57286df0a29dce7b3f5703ff2b2c24f91253aeffffffff5b85426233ba2ae502c759d3a433e5def655d1fbdf97c4b5059e77b9744ca23300000000b40047304402207d2094abd103ec6e66ed6b16fc03fe3b87ed55de0e490a590079a76aec492ee90220374e127912d51fd5f905a0873e32a8daa27bda9c09a547f3cd81f56b718ee6f9014c695221038024c9365f8f810891735ba152ece8464e317aa30ee72a5c4237a1b2bf1d4bab21025b66887300c850a559cced396f2fde7db3d12df821c4927c1b177ab6f3d2430d21024e15bcf446bd90489de58502887eea57286df0a29dce7b3f5703ff2b2c24f91253aeffffffff01605af405000000001976a914054e3d7f9acff76037ebb8836f255a411bc3798e88ac00000000
4.
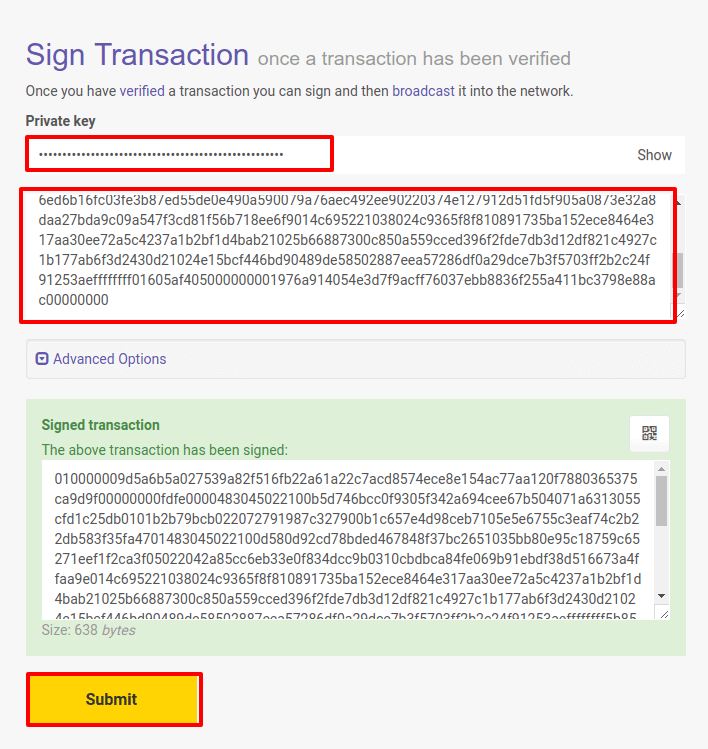
We send this signed transaction to one of the other participants to sign using the same process and we get this twice signed transaction:
NOTE The 2nd party involved in this step cannot change where the funds are redeemed and any intercepting parties cannot either so this transaction can also be transmitted through insecure channels. The receiving party has the ability to verify (using the verify panel) that the funds are going to an agreed upon wallet.
010000009d5a6b5a027539a82f516fb22a61a22c7acd8574ece8e154ac77aa120f7880365375ca9d9f00000000fdfe0000483045022100b5d746bcc0f9305f342a694cee67b504071a6313055cfd1c25db0101b2b79bcb022072791987c327900b1c657e4d98ceb7105e5e6755c3eaf74c2b22db583f35fa4701483045022100d580d92cd78bded467848f37bc2651035bb80e95c18759c65271eef1f2ca3f05022042a85cc6eb33e0f834dcc9b0310cbdbca84fe069b91ebdf38d516673a4ffaa9e014c695221038024c9365f8f810891735ba152ece8464e317aa30ee72a5c4237a1b2bf1d4bab21025b66887300c850a559cced396f2fde7db3d12df821c4927c1b177ab6f3d2430d21024e15bcf446bd90489de58502887eea57286df0a29dce7b3f5703ff2b2c24f91253aeffffffff5b85426233ba2ae502c759d3a433e5def655d1fbdf97c4b5059e77b9744ca23300000000fc0047304402207d2094abd103ec6e66ed6b16fc03fe3b87ed55de0e490a590079a76aec492ee90220374e127912d51fd5f905a0873e32a8daa27bda9c09a547f3cd81f56b718ee6f90147304402200da015d23651d8f7ad2aa81374bf643664f6ce14e105fb69b263c74eb9ad42840220155f7c8f046a304f824f8e9eba00fa739c0b98f28c1d16ef21e89321be675da0014c695221038024c9365f8f810891735ba152ece8464e317aa30ee72a5c4237a1b2bf1d4bab21025b66887300c850a559cced396f2fde7db3d12df821c4927c1b177ab6f3d2430d21024e15bcf446bd90489de58502887eea57286df0a29dce7b3f5703ff2b2c24f91253aeffffffff01605af405000000001976a914054e3d7f9acff76037ebb8836f255a411bc3798e88ac00000000
5.
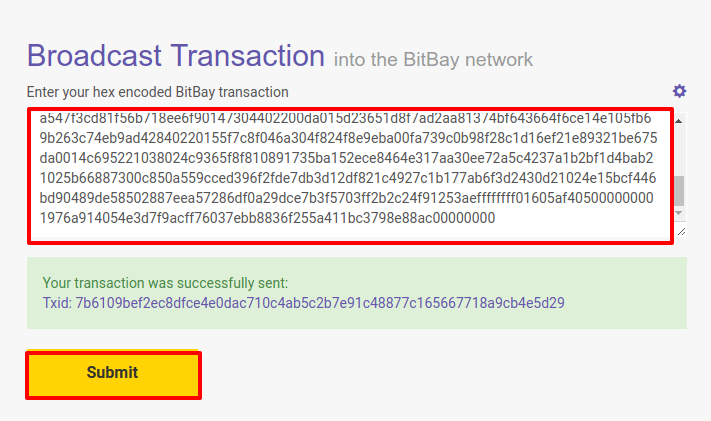
We Broadcast the signed transaction and once everything is ok we receive the TX ID shown below:
NOTE: The time of the last signing to the broadcasting should not be too long otherwise we might receive a transaction error and the network would refuse our transaction.
CLOSING NOTES:
- All funds have to be withdrawn on one transaction. Anything left over will be considered a transaction fee (which you will be warned about in advance)
- The last signature and the actual broadcasting should not have too much time between them as it can lead to the network not accepting the transaction
- The order of the signatures is significant. They must be put in the same order the multisig was created. If this process is not followed the signatures might seem OK but the network will reject the broadcast.
- The passing of the once signed transaction can be done through insecure channels because no one can change the redeeming wallet and amount
- The 2nd signatory can verify the transaction is what was agreed upon and sign and broadcast